Official Luthiers Forum! http://www-.luthiersforum.com/forum/ |
|
Need Advice...Help!! http://www-.luthiersforum.com/forum/viewtopic.php?f=10102&t=3333 |
Page 1 of 1 |
Author: | WalterK [ Mon Sep 26, 2005 9:01 am ] |
Post subject: | |
Well, tomorrow I am going to try my hand at routing a channel for a rosette. This time I'm going to try it for the first time on a scap piece of spruce. 
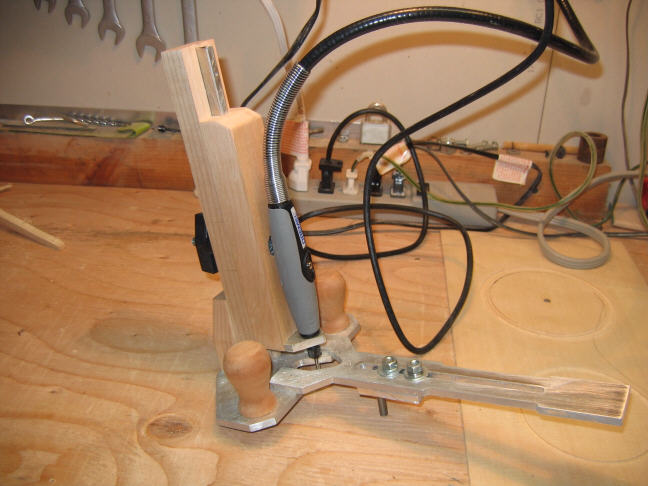
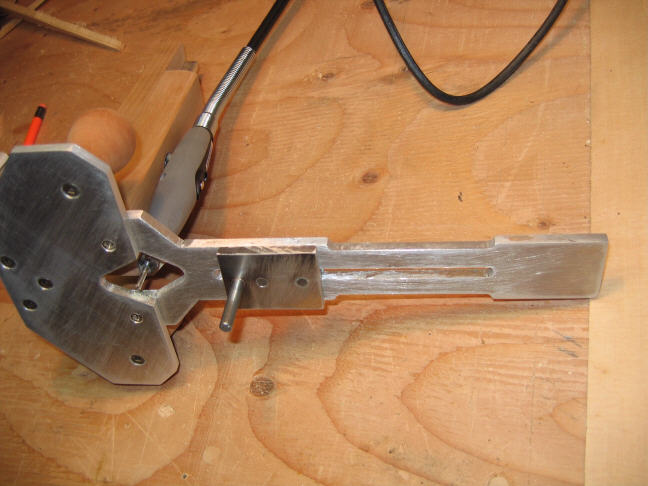
I'm using the Sloane jig from StewMac and my trusted friend "Dopie". Dopie is my friend...Dopie the Dremel. Can you guys please give me some pre-procedure advice before I go for it?? I sure would appreciate your help! Thanks, WalterK ![]() |
Author: | JJ Donohue [ Mon Sep 26, 2005 9:36 am ] |
Post subject: | |
...practice until you're confident ...accurately draw out your circles ...stay on the lines ...Take small bites util you achieve final depth ...Go slow ...make sure everything is tightened down ...keep the dust out of the way so you can see what you're doing ...good luck |
Author: | LanceK [ Mon Sep 26, 2005 9:40 am ] |
Post subject: | |
Walter, I use the Stewmac dremel attachment for all my rosettes, I always start at the area under the freboard extension to size up depth and width,then cut clockwise, going slow to avoid chip out, I also cut to final depth in one pass, as my inlays are rarely thicker than .050 or so. I'm not saying this is the best or only way, but rather the way I do it. And it has worked well for me. |
Author: | RussellR [ Mon Sep 26, 2005 9:56 am ] |
Post subject: | |
Hi Walter I use the stew mac tool too, just take it nice and easy, I find it helps alot if the top has been sealed with a coat of shellac before you cut the rossette, it helps give a cleaner job the other thing I like to do is leave the centre piece for the soundhole cut but not all the way through until you have your rossette in and levelled that way if something doesn't go right, you can always recut. |
Author: | RussellR [ Mon Sep 26, 2005 9:57 am ] |
Post subject: | |
Oh and I will reinterate JJ's point make sure all the adjusters are fully tightened. |
Author: | John Kinnaird [ Mon Sep 26, 2005 10:29 am ] |
Post subject: | |
I would try to make sure that the rotation of the dremel is such that you are always making a climbing cut. That will help keep the wood fibers from picking up and making a less than clean edge against the rosette. That means the dremel will be turned around its axis in opposite directions depending on whether your cutting surface is inside the rosette opening (the edge nearest the soundhole) or the outside rosette opening (the edge away from the soundhole) John |
Author: | Brock Poling [ Mon Sep 26, 2005 11:41 am ] |
Post subject: | |
A while back I wrote up a little article on cutting a rosette and installing it. I have since modified the process (particularly the part about plate jointing... now I use a hand plane), but if you are interested CLICK HERE It is a kind of slow approach, but it yeilds good results. |
Author: | Paul Schulte [ Mon Sep 26, 2005 12:00 pm ] |
Post subject: | |
All good advice here. I use a homemade version of the StewMac rosette cutter that uses their dremel router base. Like lance says start under the fingerboard. One thing I have made up is a template of the rosette channels in some scrap birch ply. Makes it quick and easy to set up the different radii I use. |
Author: | old man [ Mon Sep 26, 2005 2:13 pm ] |
Post subject: | |
Walter, I cut my first one yesterday with the stew-mac dremel base and circle attachment. It did a really nice job. I had to drill two holes to get a tight fit for my centering pin. My bits aren't exactly the same size, apparently. The hole made by using my brad point bit was a little loose so I drilled one with a regular drill bit and it was a nice snug fit, which you need. The other thing I would mention is to watch the sawdust. It gets under the base and might not give a level bottom. Blow it out after you've gone around and make another pass. Ron |
Author: | Robbie O'Brien [ Mon Sep 26, 2005 2:17 pm ] |
Post subject: | |
[QUOTE=RussellR] Oh and I will reinterate JJ's point make sure all the adjusters are fully tightened.[/QUOTE] I will say it again, make sure everything is tightened. I use the precision microfence tool and just a couple of days ago I forgot to tighten the adjuster and as I was going around the circle it was getting prgoressively larger. I didn't catch it til about halfway around the rosette channel. I had to come up with some extra purfling lines to salvage the thing. |
Author: | CarltonM [ Mon Sep 26, 2005 3:00 pm ] |
Post subject: | |
[QUOTE=Robbie O'Brien] I use the precision microfence tool and just a couple of days ago I forgot to tighten the adjuster and as I was going around the circle it was getting prgoressively larger. [/QUOTE] Oooo...I think you've discovered something important--the spiral rosette!!! ![]() |
Author: | tippie53 [ Mon Sep 26, 2005 3:35 pm ] |
Post subject: | |
One thing to ad SPRAY A COAT OF SEALER this helps to keep Mr.Chipout to a minimum john |
Author: | Shane Neifer [ Mon Sep 26, 2005 4:21 pm ] |
Post subject: | |
Hi Walter, I destroyed my first two tops. All of the advice above is right on! Seal the top, I use hobby laquer in the aerosal can, quick, handy and easy. For the first two attempts I used dremel bits. The dremel burrs work way better on spruce than their mini router bits. Keep your dremel speed fairly high and go relatively slow but keep moving to avoid burning. My frustration in the first two attempts lead me to build this router base (it now has mac-tac plastic on the bottom): ![]() ![]() And I bought stew-mac down cut spirals. There was a post a few months ago on MIMF about the new dremels and how they are equipped with a rubber bushing for the main bearings. This means that if you push too hard you can create some 'play' in the channel you are cutting. So when I built this base I uses the flex shaft which appearantly does not have the rubber bits. I practised on scrap for each cut just prior to each line, I didn't cut shallow and then deeper but I used a 3/32 bit to outline everything. If you are using abalone with a purfling line on each side, do this whole thing and place it in a piece of scrap before you attempt to glue it down. I found this to be the trickiest part. As everyone else said, make sure all of your cranks are CRANKED and your top is securely clamped. Let us see the end result! Best of luck Shane |
Author: | Arnt Rian [ Mon Sep 26, 2005 5:48 pm ] |
Post subject: | |
I have used the Dremel for this in the past, but I now use a laminate trimmer and it works better. I have a circular base screwed to the bottom of it that has holes in varying distance from the cutter for the different rosette radii that I use. I stick a center pin (drill bit!) in one of the holes and a corresponding hole in the top where the center of the sound hole will be and turn the contraption around. I use a 1/8" adaptor in the 1/4" chuck and little Stewmac downcut bits. This setup is a lot sturdier and more powerful than the Dremel, and more fool proof. Always a good thing in my case... |
Author: | Michael Dale Payne [ Tue Sep 27, 2005 1:20 am ] |
Post subject: | |
Make a base that you clamp your top to. Make sure your hole for the pin is very tight and that the hole is true perpendicular to the work surface. Start in the fretboard area. climb cut with a sharp bit. The areas wher you are likly to error with this fixture are: out of perpendicular pin mounting loose connections worn bearings in the dremel trying to make adjustments while running the dremel. Also be aware that you can wear brass the pin bushing, so be careful placing the fixture on the pin. Many of the dremel pro series had bearings that were fine for general dremel use, but had too much run-out for exact circular cutting. I would test cut your entire rosette in scrap and test fit, looking for slightly oblong errors. If you find that your dremel is not cutting a true circle, don't replace the bearings. Buy a new model, they have better bearings. Or even better yet get a Foredom rotary set-up. jmo |
Author: | HankMauel [ Wed Sep 28, 2005 3:10 am ] |
Post subject: | |
Besides the "wash coat" of (pick your favorite sealer), be sure to do the same in the final chanel before gluing in the rosette. Keeps any glue/stains from wicking into the exposed end grains of the top. |
Page 1 of 1 | All times are UTC - 5 hours |
Powered by phpBB® Forum Software © phpBB Group http://www.phpbb.com/ |